Quick Deployment
Reminder: If you want to experience LINKIS Family Bucket: DSS + Linkis + Qualitis + Visualis + Azkaban, please visit DSS One-Key Deployment
1 Determine the installation environment
Linkis provides the following three installation environment preparation methods according to the difficulty of installation, the differences are as follows:
Lite:
Minimum environment dependency, single-node installation mode, only includes Python engine, and only needs the user's Linux environment to support Python.
Please note: the lite version only allows users to submit Python scripts.
Simple version:
depends on Python, Hadoop and Hive, distributed installation mode, including Python engine and Hive engine, requires the user's Linux environment to install Hadoop and Hive first.
The simple version allows users to submit HiveQL and Python scripts.
Standard Edition
Depends on Python, Hadoop, Hive and Spark, distributed installation mode, including Python engine, Hive engine and Spark engine, requires the user's Linux environment to install Hadoop first , Hive and Spark, Linkis machines rely on the cluster's hadoop/hive/spark configuration files, and do not need to be deployed with the DataNode and NameNode machines, but can be deployed on a separate Client machine.
The standard version allows users to submit Spark scripts (including SparkSQL, Pyspark and Scala), HiveQL and Python scripts.
Please note: the installation of the standard version requires the machine's memory to be above 10G If the machine's memory is not enough, you need to add or modify the environment variable: export SERVER_HEAP_SIZE="512M"
2 Simplified version of Linkis environment preparation
2.1. Basic software installation
The following software must be installed:
- MySQL (5.5+), How to install MySQL
- JDK (above 1.8.0_141), How to install JDK
- Python (support both 2.x and 3.x), How to install Python
2.2 Create User
For example: Deployment user is hadoop account
- Create a deployment user on the deployment machine for installation
sudo useradd hadoop
- Because the Linkis service uses sudo -u ${linux-user} to switch engines to perform operations, the deployment user needs to have sudo permissions and is password-free.
vi /etc/sudoers
hadoop ALL=(ALL) NOPASSWD: NOPASSWD: ALL
- If your Python wants to have the drawing function, you also need to install the drawing module in the installation node. The command is as follows:
python -m pip install matplotlib
2.3 Installation package preparation
from the released release of Linkis (click here to enter the download page), Download the latest installation package.
First decompress the installation package to the installation directory, and modify the configuration of the decompressed files.
tar -xvf wedatasphere-linkis-x.x.x-dist.tar.gz
(1) Modify the basic configuration
vi conf/config.sh
    SSH_PORT=22 #Specify the SSH port, if the stand-alone version is installed, it may not be configured
    deployUser=hadoop #Specify deployment user
    LINKIS_HOME=/appcom/Install/Linkis # Specify the installation directory
    WORKSPACE_USER_ROOT_PATH=file:///tmp/hadoop # Specify the user root directory, which is generally used to store the user's script files and log files, etc. It is the user's workspace.
    RESULT_SET_ROOT_PATH=file:///tmp/linkis # The result set file path, used to store the result set file of the job
    #HDFS_USER_ROOT_PATH=hdfs:///tmp/linkis #This parameter needs to be commented for the streamlined version installation
(2) Modify the database configuration
vi conf/db.sh
    # Set the connection information of the database
    # Including IP address, database name, user name, port
    # Mainly used to store user-defined variables, configuration parameters, UDF and small functions, and provide the underlying storage of JobHistory
    MYSQL_HOST=
    MYSQL_PORT=
    MYSQL_DB=
    MYSQL_USER=
    MYSQL_PASSWORD=
The environment is ready, click me to enter [5-installation deployment](#5-installation deployment)
3 Simple version of Linkis environment preparation
3.1 Basic software installation
The following software must be installed:
- MySQL (5.5+), How to install MySQL
- JDK (above 1.8.0_141), How to install JDK
- Python (support both 2.x and 3.x), How to install Python
- Hadoop (Community version and versions below CDH3.0 are supported)
- Hive (1.2.1, 2.0 and above 2.0, there may be compatibility issues)
3.2 Create User
For example: Deployment user is hadoop account
- Create deployment users on all machines that need to be deployed for installation
sudo useradd hadoop
- Because the Linkis service uses sudo -u ${linux-user} to switch engines to perform operations, the deployment user needs to have sudo permissions and is password-free.
vi /etc/sudoers
hadoop ALL=(ALL) NOPASSWD: NOPASSWD: ALL
- Set the following global environment variables on each installation node so that Linkis can use Hadoop and Hive normally
Modify the installation user's .bash_rc, the command is as follows:
vim /home/hadoop/.bash_rc
The following is an example of environment variables:
    #JDK
    export JAVA_HOME=/nemo/jdk1.8.0_141
    #HADOOP
    export HADOOP_HOME=/appcom/Install/hadoop
    export HADOOP_CONF_DIR=/appcom/config/hadoop-config
    #Hive
    export HIVE_HOME=/appcom/Install/hive
    export HIVE_CONF_DIR=/appcom/config/hive-config
3.3 SSH password-free configuration (required for distributed mode)
If your Linkis are deployed on the same server, this step can be skipped.
If your Linkis is deployed on multiple servers, then you also need to configure ssh password-free login for these servers.
How to configure SSH password-free login
3.4 Installation package preparation
from the released release of Linkis (click here to enter the download page), Download the latest installation package.
First decompress the installation package to the installation directory, and modify the configuration of the decompressed files.
tar -xvf wedatasphere-linkis-x.x.x-dist.tar.gz
(1) Modify the basic configuration
vi /conf/config.sh
erties

    deployUser=hadoop #Specify deployment user
    LINKIS_HOME=/appcom/Install/Linkis # Specify the installation directory
    WORKSPACE_USER_ROOT_PATH=file:///tmp/hadoop # Specify the user root directory, which is generally used to store the user's script files and log files, etc. It is the user's workspace.
    HDFS_USER_ROOT_PATH=hdfs:///tmp/linkis # Specify the user's HDFS root directory, which is generally used to store the result set files of the job

    # If you want to use it with Scriptis, the CDH version of Hive, you also need to configure the following parameters (the community version of Hive can ignore this configuration)
    HIVE_META_URL=jdbc://... # HiveMeta Metadata Database URL
    HIVE_META_USER= # HiveMeta Metadata Database User
    HIVE_META_PASSWORD= # Password of HiveMeta Metabase

    # Configure hadoop/hive/spark configuration directory
    HADOOP_CONF_DIR=/appcom/config/hadoop-config #hadoop's conf directory
    HIVE_CONF_DIR=/appcom/config/hive-config #hive's conf directory
(2) Modify the database configuration
vi conf/db.sh
    # Set the connection information of the database
    # Including IP address, database name, user name, port
    # Mainly used to store user-defined variables, configuration parameters, UDF and small functions, and provide the underlying storage of JobHistory
    MYSQL_HOST=
    MYSQL_PORT=
    MYSQL_DB=
    MYSQL_USER=
    MYSQL_PASSWORD=
The environment is ready, click me to enter [5-installation deployment](#5-installation deployment)
4 Standard Linkis Environment Preparation
4.1 Basic software installation
The following software must be installed:
- MySQL (5.5+), How to install MySQL
- JDK (above 1.8.0_141), How to install JDK
- Python (support both 2.x and 3.x), How to install Python
- Hadoop (Community version and versions below CDH3.0 are supported)
- Hive (1.2.1, 2.0 and above 2.0, there may be compatibility issues)
- Spark (Start from Linkis release 0.7.0, support all versions above Spark 2.0)
4.2 Create User
For example: Deployment user is hadoop account
- Create deployment users on all machines that need to be deployed for installation
sudo useradd hadoop
- Because the Linkis service uses sudo -u ${linux-user} to switch engines to perform operations, the deployment user needs to have sudo permissions and is password-free.
vi /etc/sudoers
hadoop ALL=(ALL) NOPASSWD: NOPASSWD: ALL
Set the following global environment variables on each installation node so that Linkis can use Hadoop, Hive and Spark normally
Modify the .bash_rc of the installing user, the command is as follows:
vim /home/hadoop/.bash_rc
The following is an example of environment variables:
    #JDK
    export JAVA_HOME=/nemo/jdk1.8.0_141
    #HADOOP
    export HADOOP_HOME=/appcom/Install/hadoop
    export HADOOP_CONF_DIR=/appcom/config/hadoop-config
    #Hive
    export HIVE_HOME=/appcom/Install/hive
    export HIVE_CONF_DIR=/appcom/config/hive-config
    #Spark
    export SPARK_HOME=/appcom/Install/spark
    export SPARK_CONF_DIR=/appcom/config/spark-config/spark-submit
    export PYSPARK_ALLOW_INSECURE_GATEWAY=1 # Pyspark must add parameters
- If your Pyspark wants to have the drawing function, you also need to install the drawing module on all installation nodes. The command is as follows:
python -m pip install matplotlib
4.3 SSH password-free configuration (required for distributed mode)
If your Linkis are deployed on the same server, this step can be skipped.
If your Linkis is deployed on multiple servers, then you also need to configure ssh password-free login for these servers.
How to configure SSH password-free login
4.4 Installation package preparation
from the released release of Linkis (click here to enter the download page), Download the latest installation package.
First decompress the installation package to the installation directory, and modify the configuration of the decompressed files.
tar -xvf wedatasphere-linkis-x.x.0-dist.tar.gz
(1) Modify the basic configuration
vi conf/config.sh
    SSH_PORT=22 #Specify the SSH port, if the stand-alone version is installed, it may not be configured
    deployUser=hadoop #Specify deployment user
    LINKIS_HOME=/appcom/Install/Linkis # Specify the installation directory
    WORKSPACE_USER_ROOT_PATH=file:///tmp/hadoop # Specify the user root directory, which is generally used to store the user's script files and log files, etc. It is the user's workspace.
    HDFS_USER_ROOT_PATH=hdfs:///tmp/linkis # Specify the user's HDFS root directory, which is generally used to store the result set files of the job

    # If you want to use it with Scriptis, the CDH version of Hive, you also need to configure the following parameters (the community version of Hive can ignore this configuration)
    HIVE_META_URL=jdbc://... # HiveMeta Metadata Database URL
    HIVE_META_USER= # HiveMeta Metadata Database User
    HIVE_META_PASSWORD= # Password of HiveMeta Metabase

    # Configure hadoop/hive/spark configuration directory
    HADOOP_CONF_DIR=/appcom/config/hadoop-config #hadoop's conf directory
    HIVE_CONF_DIR=/appcom/config/hive-config #hive's conf directory
    SPARK_CONF_DIR=/appcom/config/spark-config #spark's conf directory
(2) Modify the database configuration
vi conf/db.sh
    # Set the connection information of the database
    # Including IP address, database name, user name, port
    # Mainly used to store user-defined variables, configuration parameters, UDF and small functions, and provide the underlying storage of JobHistory
    MYSQL_HOST=
    MYSQL_PORT=
    MYSQL_DB=
    MYSQL_USER=
    MYSQL_PASSWORD=
5 Installation and deployment
5.1 Execute the installation script:
sh bin/install.sh
5.2 Installation steps
- The install.sh script will ask you about the installation mode.
The installation mode is condensed mode, simple mode or standard mode. Please choose the appropriate installation mode according to the environment you prepare.
- The install.sh script will ask you if you need to initialize the database and import metadata.
Because the user is worried that the user repeatedly executes the install.sh script to clear the user data in the database, when the install.sh is executed, the user will be asked if they need to initialize the database and import metadata.
Yes must be selected for the first installation.
5.3 Is the installation successful:
Check whether the installation is successful by viewing the log information printed on the console.
If there is an error message, you can check the specific reason for the error.
5.4 Quick start Linkis
(1), start the service:
Execute the following command in the installation directory to start all services:
./bin/start-all.sh> start.log 2>start_error.log
(2), check whether the startup is successful
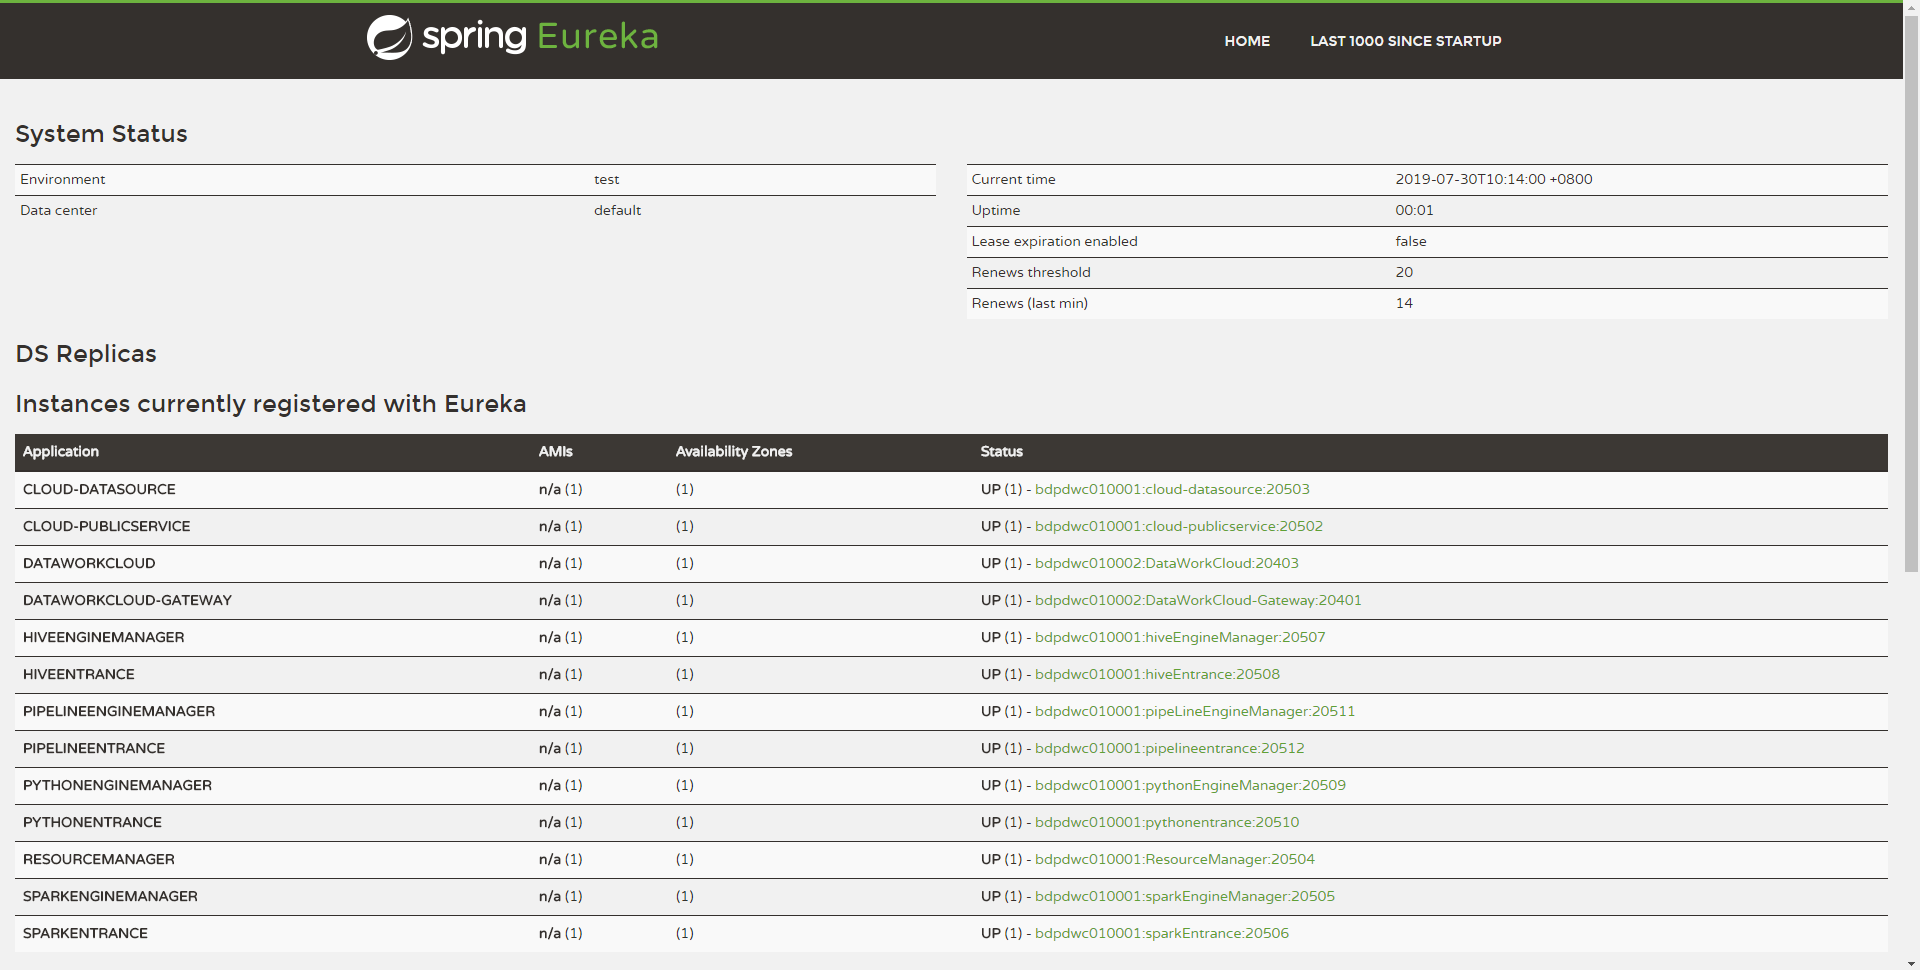
You can check the success of the service startup on the Eureka interface, and check the method:
Use http://${EUREKA_INSTALL_IP}:${EUREKA_PORT}, open it in a browser, and view the server Whether the registration is successful.
If you did not specify EUREKA_INSTALL_IP and EUREKA_INSTALL_IP in config.sh, the HTTP address is: http://127.0.0.1:20303
As shown in the figure below, if the following microservices appear on your Eureka homepage, it means that the services have been started successfully and you can provide services to the outside world normally:
Note: The ones marked in red are DSS services, and the rest are services of Linkis. If you only use linkis, you can ignore the parts marked in red
6. Quickly use Linkis
6.1 Overview
Linkis provides users with a Java client implementation, and users can use UJESClient to quickly access Linkis back-end services.
6.2 Fast running
We provide two test classes of UJESClient under the ujes/client/src/test module:
    com.webank.wedatasphere.linkis.ujes.client.UJESClientImplTestJ # Java-based test class
    com.webank.wedatasphere.linkis.ujes.client.UJESClientImplTest # Test class based on Scala implementation
If you cloned the source code of Linkis, you can run these two test classes directly.
6.3 Quick implementation
The following specifically introduces how to quickly implement a linkis code submission and execution.
6.3.1 maven dependency
<dependency>
  <groupId>com.webank.wedatasphere.Linkis</groupId>
  <artifactId>Linkis-ujes-client</artifactId>
  <version>0.11.0</version>
</dependency>
6.3.2 Reference Implementation
-JAVA
package com.webank.bdp.dataworkcloud.ujes.client;

import com.webank.wedatasphere.Linkis.common.utils.Utils;
import com.webank.wedatasphere.Linkis.httpclient.dws.authentication.StaticAuthenticationStrategy;
import com.webank.wedatasphere.Linkis.httpclient.dws.config.DWSClientConfig;
import com.webank.wedatasphere.Linkis.httpclient.dws.config.DWSClientConfigBuilder;
import com.webank.wedatasphere.Linkis.ujes.client.UJESClient;
import com.webank.wedatasphere.Linkis.ujes.client.UJESClientImpl;
import com.webank.wedatasphere.Linkis.ujes.client.request.JobExecuteAction;
import com.webank.wedatasphere.Linkis.ujes.client.request.ResultSetAction;
import com.webank.wedatasphere.Linkis.ujes.client.response.JobExecuteResult;
import com.webank.wedatasphere.Linkis.ujes.client.response.JobInfoResult;
import com.webank.wedatasphere.Linkis.ujes.client.response.JobProgressResult;
import com.webank.wedatasphere.Linkis.ujes.client.response.JobStatusResult;
import org.apache.commons.io.IOUtils;

import java.util.concurrent.TimeUnit;


public class UJESClientImplTestJ{
    public static void main(String[] args){
        // 1. Configure DWSClientBuilder, get a DWSClientConfig through DWSClientBuilder
        DWSClientConfig clientConfig = ((DWSClientConfigBuilder) (DWSClientConfigBuilder.newBuilder()
                .addUJESServerUrl("http://${ip}:${port}") //Specify ServerUrl, the address of the Linkis server-side gateway, such as http://{ip}:{port}
                .connectionTimeout(30000) //connectionTimeOut client connection timeout
                .discoveryEnabled(true).discoveryFrequency(1, TimeUnit.MINUTES) //Whether to enable registration discovery, if enabled, the newly launched Gateway will be automatically discovered
                .loadbalancerEnabled(true) // Whether to enable load balancing, if registration discovery is not enabled, load balancing is meaningless
                .maxConnectionSize(5) //Specify the maximum number of connections, that is, the maximum number of concurrent
                .retryEnabled(false).readTimeout(30000) //execution failed, whether to allow retry
                .setAuthenticationStrategy(new StaticAuthenticationStrategy()) //AuthenticationStrategy Linkis authentication method
                .setAuthTokenKey("johnnwang").setAuthTokenValue("Abcd1234"))) //Authentication key, generally the user name; authentication value, generally the password corresponding to the user name
                .setDWSVersion("v1").build(); //Linkis backend protocol version, the current version is v1

        // 2. Get a UJESClient through DWSClientConfig
        UJESClient client = new UJESClientImpl(clientConfig);

        // 3. Start code execution
        JobExecuteResult jobExecuteResult = client.execute(JobExecuteAction.builder()
                .setCreator("LinkisClient-Test") //creator, requesting the system name of the Linkis client, used for system-level isolation
                .addExecuteCode("show tables") //ExecutionCode The code to be executed
                .setEngineType(JobExecuteAction.EngineType$.MODULE$.HIVE()) // The execution engine type of Linkis that you want to request, such as Spark hive, etc.
                .setUser("johnnwang") //User, requesting user; used for user-level multi-tenant isolation
                .build());
        System.out.println("execId: "+ jobExecuteResult.getExecID() + ", taskId:" + jobExecuteResult.taskID());

        // 4. Get the execution status of the script
        JobStatusResult status = client.status(jobExecuteResult);
        while(!status.isCompleted()) {
            // 5. Get the execution progress of the script
            JobProgressResult progress = client.progress(jobExecuteResult);
            Utils.sleepQuietly(500);
            status = client.status(jobExecuteResult);
        }

        // 6. Get the job information of the script
        JobInfoResult jobInfo = client.getJobInfo(jobExecuteResult);
        // 7. Get the list of result sets (if the user submits multiple SQL at a time, multiple result sets will be generated)
        String resultSet = jobInfo.getResultSetList(client)[0];
        // 8. Get a specific result set through a result set information
        Object fileContents = client.resultSet(ResultSetAction.builder().setPath(resultSet).setUser(jobExecuteResult.getUser()).build()).getFileContent();
        System.out.println("fileContents: "+ fileContents);
        IOUtils.closeQuietly(client);
    }
}
-SCALA
import java.util.concurrent.TimeUnit

import com.webank.wedatasphere.Linkis.common.utils.Utils
import com.webank.wedatasphere.Linkis.httpclient.dws.authentication.StaticAuthenticationStrategy
import com.webank.wedatasphere.Lin
kis.httpclient.dws.config.DWSClientConfigBuilder
import com.webank.wedatasphere.Linkis.ujes.client.request.JobExecuteAction.EngineType
import com.webank.wedatasphere.Linkis.ujes.client.request.{JobExecuteAction, ResultSetAction}
import org.apache.commons.io.IOUtils

object UJESClientImplTest extends App {

  // 1. Configure DWSClientBuilder, get a DWSClientConfig through DWSClientBuilder
  val clientConfig = DWSClientConfigBuilder.newBuilder()
    .addUJESServerUrl("http://${ip}:${port}") //Specify ServerUrl, the address of the Linkis server-side gateway, such as http://{ip}:{port}
    .connectionTimeout(30000) //connectionTimeOut client connection timeout
    .discoveryEnabled(true).discoveryFrequency(1, TimeUnit.MINUTES) //Whether to enable registration discovery, if enabled, the newly launched Gateway will be automatically discovered
    .loadbalancerEnabled(true) // Whether to enable load balancing, if registration discovery is not enabled, load balancing is meaningless
    .maxConnectionSize(5) //Specify the maximum number of connections, that is, the maximum number of concurrent
    .retryEnabled(false).readTimeout(30000) //execution failed, whether to allow retry
    .setAuthenticationStrategy(new StaticAuthenticationStrategy()) //AuthenticationStrategy Linkis authentication method
    .setAuthTokenKey("${username}").setAuthTokenValue("${password}") //Authentication key, generally the user name; authentication value, generally the password corresponding to the user name
    .setDWSVersion("v1").build() //Linkis backend protocol version, the current version is v1

  // 2. Get a UJESClient through DWSClientConfig
  val client = UJESClient(clientConfig)

  // 3. Start code execution
  val jobExecuteResult = client.execute(JobExecuteAction.builder()
    .setCreator("LinkisClient-Test") //creator, requesting the system name of the Linkis client, used for system-level isolation
    .addExecuteCode("show tables") //ExecutionCode The code to be executed
    .setEngineType(EngineType.SPARK) // The execution engine type of Linkis that you want to request, such as Spark hive, etc.
    .setUser("${username}").build()) //User, request user; used for user-level multi-tenant isolation
  println("execId: "+ jobExecuteResult.getExecID + ", taskId:" + jobExecuteResult.taskID)

  // 4. Get the execution status of the script
  var status = client.status(jobExecuteResult)
  while(!status.isCompleted) {
  // 5. Get the execution progress of the script
    val progress = client.progress(jobExecuteResult)
    val progressInfo = if(progress.getProgressInfo != null) progress.getProgressInfo.toList else List.empty
    println("progress: "+ progress.getProgress + ", progressInfo:" + progressInfo)
    Utils.sleepQuietly(500)
    status = client.status(jobExecuteResult)
  }

  // 6. Get the job information of the script
  val jobInfo = client.getJobInfo(jobExecuteResult)
  // 7. Get the list of result sets (if the user submits multiple SQL at a time, multiple result sets will be generated)
  val resultSet = jobInfo.getResultSetList(client).head
  // 8. Get a specific result set through a result set information
  val fileContents = client.resultSet(ResultSetAction.builder().setPath(resultSet).setUser(jobExecuteResult.getUser).build()).getFileContent
  println("fileContents: "+ fileContents)
  IOUtils.closeQuietly(client)
}